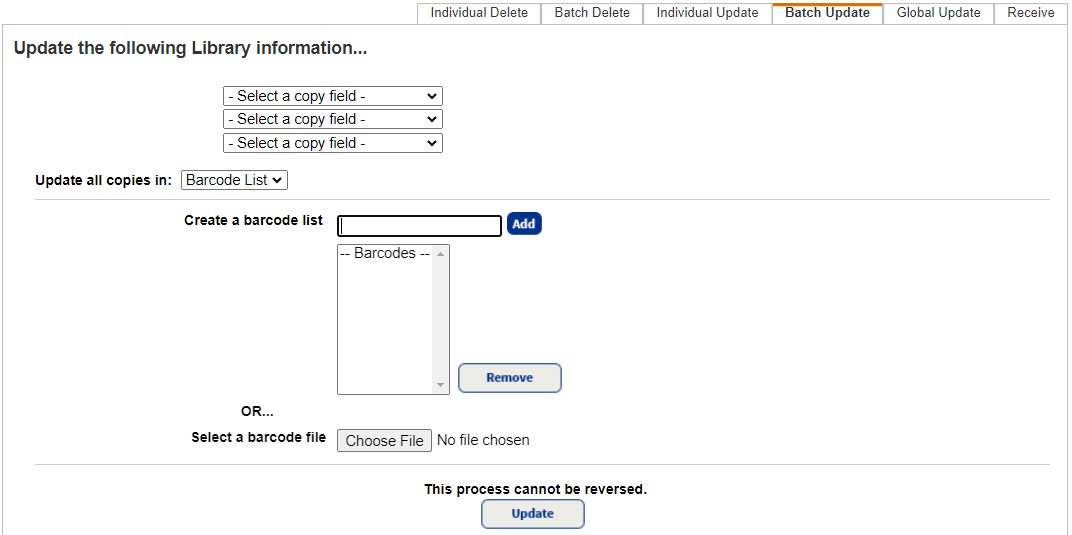
Use the Batch Update sub-tab
Batch Update lets you do any of the following for a group of copies:
- Add a category.
- Add, change, or remove the call number prefix.
- Change the circulation type.
Note: This is not available for district media centers.
- Change or remove the sublocation.
You determine the changes to be made, and then identify the copies by creating a list, or uploading a barcode file.
This saves you the time you would otherwise spend editing each individual record.
To update a batch of library copies:
- Select Catalog > Update Copies > Batch Update sub-tab.

- If you manage library materials for your district, select the school that owns the copies to be updated from the Site drop-down.

- If you manage both your library materials and textbooks in Destiny, select Library from the Update the following drop-down.
- From the first drop-down, select the copy field you want to change.
- In the drop-down that appears, select or type the new information.
Notes:
- Add Category does not delete any other categories the copies may have.
- To remove a call number prefix, select Change Call Number Prefix to from the first drop-down and leave the next field blank. This process does not remove a Call Number Prefix if it would leave the copy without any call number.
- To remove a sublocation, select Change Sublocation to from the first drop-down and leave the next field blank.
- To update a second or third field, repeat steps 4 and 5.
- From the Update all copies in drop-down, select a method for identifying the copies to include:
- Barcode List: Either create a new list, or select an existing barcode file:
- Scan or type the barcodes in the Create a barcode list field, and then click Add. To remove a barcode number from the list, select it and click Remove.
- Click Choose File (or Browse, depending on your browser) to locate and select your file of barcode numbers.
- List: Select the Resource List to be updated. To review the contents of the Resource List, click View List.
- Barcode List: Either create a new list, or select an existing barcode file:
- To begin the update, click Update and then Yes on the confirmation message.
When the update process ends, Destiny produces a report that lists each copy updated or skipped and the reason. To view the report, select Admin > Job Manager.
To update a batch of textbook copies:
Batch Update lets you change the condition or the location of a group of textbooks using a file of barcode numbers.
- Create and save a text file listing the barcodes of the copies to be updated. Alternatively, collect the barcode scans with a Follett wireless handheld device, and then transfer the scan file to your workstation.
- Select Catalog > Update Copies > Batch Update sub-tab.
- If you manage both library materials and textbooks in Destiny, select Textbook from the Update the following drop-down.
- Choose to update the Condition or Location:
- To change the condition of the textbooks, select Condition, and then choose the new condition from the list.
- To change the location, select Location, and then choose a location from the list, or click Other to define a new location.
- To change the condition of the textbooks, select Condition, and then choose the new condition from the list.
- Click Browse (or Choose File, depending on your browser) to locate your Scan.Log or text file.
- To begin the update, click Update and then Yes on the confirmation message.
When the update process ends, Destiny produces a report that lists each copy updated or skipped and the reason. To view the report, select Admin > Job Manager.