Export titles
There are various reasons you might need to export titles from Destiny, such as to:
- Make copies of some or all of the title records in your collection.
- Share records with other libraries.
- Re-arrange your collection with other schools because of a change in the district.
- Send your data to Follett School Solutions, LLC or another vendor for enhancement.
- Create a file to import to a learning system, such as a learning management system or learning object repository.
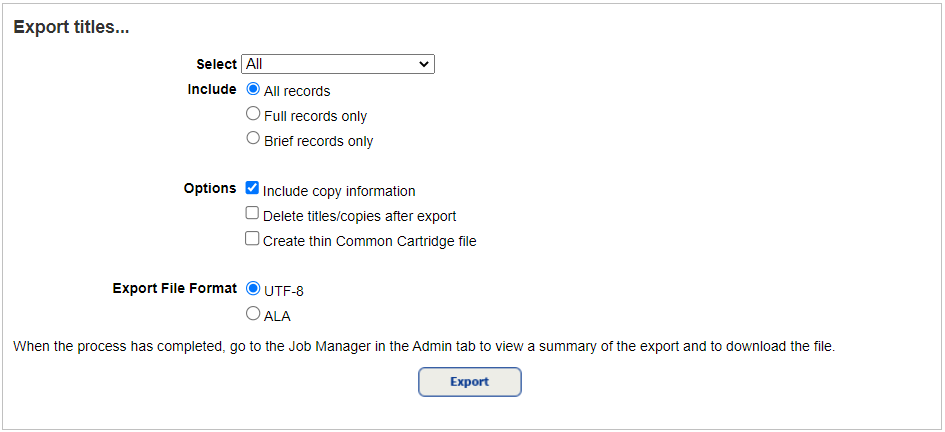
To export your records:
|
Note: If you are a district library materials manager, choose to export from the district collection or from a particular site. If you choose the district, you cannot select by barcode or by copy category, or choose to delete the records after import. |
- Select Catalog > Export Titles.

- Use the Select drop-down to select the method for identifying the records:
- All: Includes all titles in your collection.
- All Follett Digital Materials: Includes only Follett Digital materials.
- by barcode: Either browse to, or create, a list:
- Click Choose File to find and select your file.
- Place the cursor in the Create a barcode list field, and scan the barcodes, or type them in and click Add. To remove a barcode number from the list, select it and click Remove.
- by copy category: If you have multiple Copy Categories, select the one with the records you are exporting.
- from List: If you have multiple Resource Lists, select the list containing the records you are exporting.
To view the contents of the selected list, click View List.
- Next to Include, select All records, Full records only, or Brief records only (those that do not contain tags between 305 and 899).
- Select any of the following options:
If you select this option Then... Include copy information The export includes the following based on what you selected in step 2:
- If you selected All or from a list, all of the titles' copies are included.
- If you selected by barcode, only the copies scanned are included.
- If you selected by Copy Category, only the copies assigned to the category are included.
Note: If you are a district user and chose an individual site, only the copies belonging to that site are exported with the title records.
Delete titles/copies after export (site-level only) Important: Use this option with caution.
Exported titles and copies are deleted from your collection at the end of the process.
If you select this option and your district tracks a reason and disposal method for weeded materials:
Note: If your district disabled these options, they do not appear.
- From the Reason drop-down, select a reason for deletion.
- From the Disposal Method drop-down, select a disposal method (optional).
Notes:
- Destiny does not delete a title record that is shared with other sites in the district; however, it removes it from your collection.
- Checked-out copies are not deleted.
Create thin Common Cartridge file This file format follows the IMS Global® Learning Consortium's Thin Common Cartridge™ standard, which lets you integrate Destiny Discover resources into compliant learning systems. For background information on the Thin Common Cartridge standard, visit www.imsglobal.org/cc.
If you select this option:
- Select a version.
- Complete the LTI Code and LTI Code Description fields (optional, depending on your learning system's requirements).
Note: To use this feature, Destiny must be configured as a Learning Tools Interoperability® (LTI) tool in the learning system you are adding resources to.
- Select the character set to be used for the export file. For most records, ALA suffices. If your records contain characters or diacritics not supported in ALA, select UTF-8.
- Click Export.
Destiny creates a Job Summary listing the titles and copies deleted. It also includes a link to download the export file.
|
Note: If you include copy information:
|