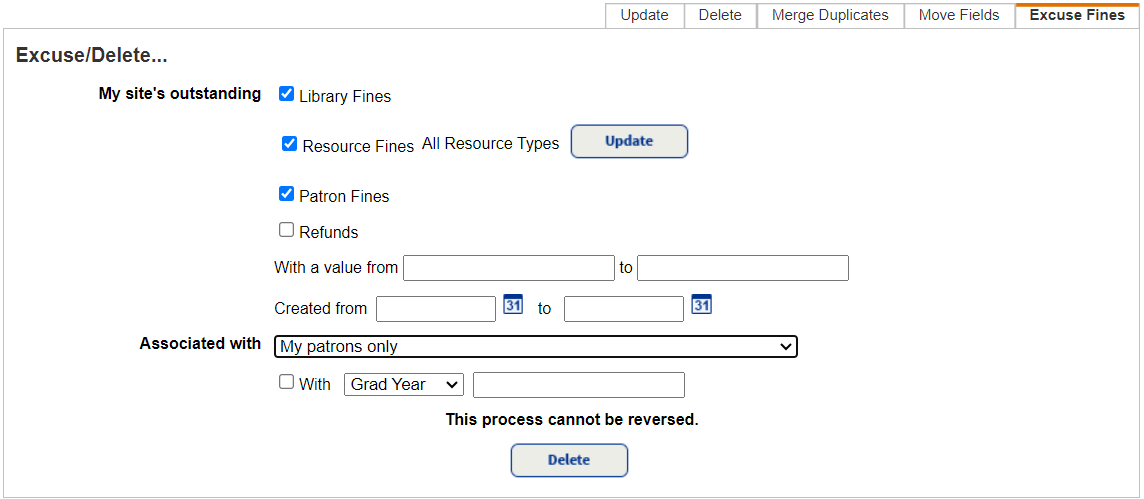
Excuse fines
The Excuse Fines sub-tab
|
Note: Resource-only sites do not have patron fines. |
|
Important: Excusing or deleting fines cannot be undone. This process only deletes fines assessed at your school. |
To excuse or delete fines:
- Select Admin > Update Patrons > Excuse Fines sub-tab.

- In the My site's outstanding section, choose the type of fines to excuse/delete.
Notes:
- You have to be logged in as View All to see library and resource fines.
- An example of a patron fine is $5 for a lost ID.
- If you select this checkbox, refunds from both Library Manager and Resource Manager will be excused/deleted.
- If you are deleting resource fines and want to choose a specific type, next to All Resource Types, click Update.
Note: To delete resource fines, you need the Delete resource fines permission. - To further limit the process, complete any of the following fields:
Use this field to... With a value from ___ to ___ Limit the deletion of fines to a value range.
- Leave both from and to fields blank – the report removes all fines, regardless of the amount.
- Leave the from field blank and enter a value in the to field – the report includes all those, up to and including the value entered.
- Enter a value in the from field and leave the to field blank – the report includes that value and all those after it.
- Enter the same value in both fields – the report is limited to that value.
Created from ___ to ____ Limit the deletion of fines to a date range.
- Leave both the from and to fields blank – the report includes all dates.
- Leave the from field blank, and enter a date in the to field – the report includes all those up to and including the date entered.
- Enter a date in the from field, and leave the to field blank – the report includes that date and all those after it.
- Enter the same date in both fields – the report is limited to that one date.
Associated with Use the drop-down to either:
- Delete fines for any patron with fines at your site.
- Delete fines for only your patrons.
With Limit the fine deletion to patrons by grade or graduation date. From the drop-down, select either:
- Grad Year, and enter the year in the next field.
- Grade Level, and enter the level in the next field.
- Click Delete.
- When the confirmation message appears, click Yes. The Job Manager displays the Excuse/Delete Fines job.
Note: Destiny displays Fine Deleted or Refund Deleted in each patron's Fine History for fines and refunds deleted through this process.
Job Summary
For each Excuse/Delete Fines job, Destiny generates a Job Summary showing a total count of fines and refunds that were deleted or excused. It lists each, including:
- Fine or refund type
- Amount
- Patron name
- Patron barcode
| Note: The Job Summary lists how many records were updated and skipped. Be sure to review these numbers. Also, each record contains an Edit Patron link. If you find that a record was changed in error, you can click this link to revert the data to its original state. |