Internet Options for Destiny
Applies to:
Destiny versions: 9.x, 10.x, 11.x 12.x, 13.x
This document provides a high level description of the steps necessary to allow access to Destiny from the Internet.
The following diagram and connectivity options provide information on several methods that can be used to make Destiny available on the Internet. It is intended for reference purposes only and is not a recommendation. All options should be fully researched by
the technical staff before consideration, in keeping strict compliance with any site-specific security requirements
|
Note: Diagram below contains reference or example IP addresses |
Diagram of Internet options with definitions
. 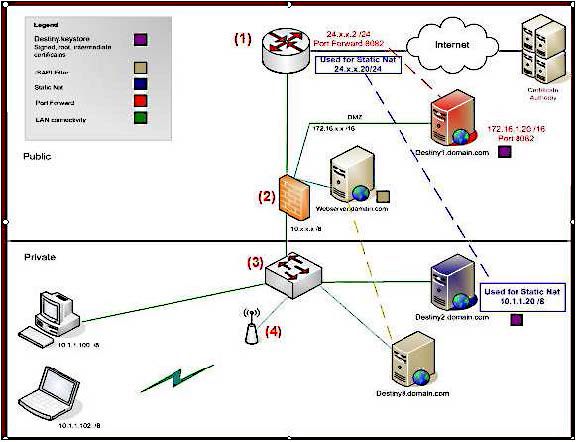
Definitions
Router (1): A physical device that makes decisions about where to send network traffic. Firewall (2): A network security device that analyzes network traffic, and decides whether to allow the traffic in or out of the network, based on pre-configured policies.
Network Switch (3): A centrally located device (typically hardware) that connects networking equipment together, allowing all of the devices connected to it to communicate with each other.
Wireless Access Point (4): A device that is physically connected to the network. It allows client devices (Laptops and PDA’s) that are using wireless networking (Wi-Fi) to gain access to the network.
Public Network: A network established and operated by a telecommunications administration, or recognized private operating agency, for the specific purpose of providing data transmission services for the public (Internet).
Private Network: A network that is owned by a specific company for the purpose of providing communication means between all devices that are connected (i.e. a school district).
Public IP address: IP addresses that are routable on the Internet. Private IP address: IP address that is only routable on a local network.
Static Nat: Network Address Translation (NAT) is a one to one mapping on a firewall that assigns a public IP address to a specific private IP address that exists in a network.
DNS Fully Qualified Domain Name (FQDN): A named reference to a specific IP address that can be used to locate a service on the Internet in place of using the IP address.
PAT: Port Address Translation is a method of allowing numerous devices in a private network to share one public IP address. Each device on the private network is assigned a port (location ID) that allows for communication to be individually maintained.
Port Forward: The action taken by a firewall when encountering traffic on a specific port, where a list of rules is cross-checked to verify if that port should be directed to a device on the network. The process of directing the traffic to a device on the network (based on predetermined target ports) is called port forwarding.
Ethernet: Generally a category 5 cable that physically connects a computer to the network (one end terminating at the computer, the other into a network switch).
Certificate Authority: A group of organizations that manages certificates, whose sole purpose is to verify the identity of that specific entity. Additionally, certificates are used to encrypt network traffic through the use of public and private keys. Certificates are usually assigned to specific FullyQualified Domain Names (FQDN’s), which map to specific public IP addresses.
Front end Server: A web server being used as the point of presence for Internet activities for an organization. Rather than connecting directly using the IP address of FQDN, the user would enter the front end server address, which redirects all requests to a specified server on the private network.
Connectivity Options
Static Nat configuration on port 80: This option is the most commonly used configuration. It requires a dedicated public IP address to be mapped to the internal address of the Destiny server. Only port 80, 443, 7777 (HTTP port used for Follett Shelf reverse authentication) and, optionally, 210 (for z39.50 protocol) should be “open” for the outside address. Additionally, an SSL certificate should be used for securing login information passing from the patron’s web browser to the Destiny server. An "A" DNS record would need to be created pointing to the external address mapped to the Destiny server. A destiny.keystore should be created from within Destiny, using the keytool program. A certificate should be generated and signed by the Vendor that the customer is using as a Certificate Authority (CA). The root, intermediate and signed certificates should be installed into the destiny.keystore.
Port Forwarding: This is rarely used. Similar to the static NAT, except a port is mapped to an existing in- use public address. Based on the port number, the traffic is routed to the Destiny server on the internal network. This is less secure as there is no direct public to private IP address translation, and there is no encryption certificate available.
ISAPI filter: This method is preferred over the reverse proxy. This method provides a way of shielding access to the Destiny server from the Internet. It uses a front end server to intercept requests based on the URL entered. The patron is unaware that they are actually communicating with the front end server, and the front end server is communicating on behalf of the patron to the Destiny server. A DNS "A" record is created for the front end server. A link on one of its web pages is pointing to a specific redirection URL. Port 8009 should be “opened” from the front end server to the Destiny server on the firewall. When using this method Destiny cannot be encrypted. More information is available in Destiny help.
Reverse Proxy: This method is similar to the ISAPI filter. However, instead of redirecting a specific URL the reverse proxy redirects domain names. It is very complex to configure and typically NOT supported by Follett for its configuration. While it remains simple in concept, it is difficult to implement and extremely tedious to troubleshoot. It typically runs on UNIX systems acting as a front end, serving multiple domains.
Network Integration
Because Destiny is a true web-based solution with HTML web pages served by a central server, network integration is extremely straightforward.
Basic Network Integration
Web browsers access the Destiny application/web server by means of standard world wide web protocols—HTTP and HTTPS over TCP/IP. No client installation of any Destiny software is required beyond the standard browser requirements. The Destiny application and database servers communicate directly with each other through TCP/IP.
Firewall and Proxy Server Integration
With Destiny, you may choose to allow home and community access over the Internet. Destiny is accessed through HTML web pages over standard HTTP and optional HTTPS protocols. As a result, Destiny is compatible with every commercially available firewall, all of which offer extensive security options for managing traffic over these protocols. By default, Destiny uses the universally recognized ports 80 and 443 for these protocols, and these ports are configurable at the district’s option.
For an additional layer of security to restrict unauthorized users fr om accessing the Application server via HTTP, Destiny is compatible with reverse proxying web servers such as Apache, ISA, and IIS. In this configuration, the proxying web server is placed outside the firewall. Incoming web traffic connects to the proxying web server. The proxying web server then makes a separate connection into Destiny and exchanges the request and response. This configuration constrains firewall traffic so only the proxying web server has direct access through the firewall.
The Destiny application server requires outbound HTTP Internet access. In an environment where a proxy server regulates HTTP traffic, the Destiny application server can be configured as a proxy client for most commercially available proxy servers. For proxy servers that require authentication, Destiny supports basic authentication for Microsoft Internet Security and Acceleration (ISA) Server. Other proxy authentications are not currently supported.
Workstation access to the Internet is required to support add-on Destiny subscription services.
Web Server Integration
Destiny includes its own internal web server; however, a web server such as Microsoft Internet Information Server or Apache can be configured to serve as a “front end” web server. This could add an additional layer of security to your implementation as well as provide additional integration options. Security Recommended user login policies for Destiny® v9.5 or higher Follett School Solutions, Inc. continues to invest in technologies that enhance product security and help in the identification of potential security vulnerabilities in Destiny Resource Management Solution. As part of that ongoing commitment, we have included several capabilities in Destiny v9.5 or higher that provide you the ability to create a tight password policy as well as to help prevent denial of service attacks. This help topic outlines the basic configuration options available to adjust the way Destiny 9.5 or higher handles login behavior. The configuration options are easily implemented and represent fairly straightforward concepts. Password and user login policies A robust password policy is an essential first step when building a secure web-based system. Using the options provided by Follett let you tighten the password policy within your school district. Destiny controls all security measures for your district from the Password Policies page.
To access these controls, login as the District Administrator, click the Setup link in the upper corner, and then select the District Options tab. Click the Edit button for the Password Policies section.
Define a strict password policy
|
Note: This section is only applicable if you are storing passwords in Destiny. If you are using another identity provider for login information, please consult the best practicesprovided by that solution provider. |
Possible security vulnerability can occur if users select common terms as their password fields. Using the Password Policies options, you can configure Destiny to enforce a strict password policy. By selecting the Strong password required check box, you require users to choose passwords that are 8 characters or greater in length and include a mixture of digits and letters.
|
Note: This setting does not invalidate existing passwords |
You can use the Login expires field to enforce your district's password change policy.
Define a password lockout policy
An effective defense against automated password discovery tools is to temporarily disable a user account after a specific number of invalid login attempts. By selecting a numerical option from the Login attempts allowed list, and then entering the number of minutes to disable the account in the Login lockout delay field, you can configure the login security to match your district's security needs.
|
Example: If you select 2 from the list and enter a 5 in the Login lockout delay field, then, after two failed login attempts, Destiny will lock the user's account for 5 minutes. |
Conclusion
Security of your system is central to protecting your district’s data. This is especially critical as the pace of technology changes and installations become more complex. To ensure your system remains reliable and to protect data integrity, Follett will continue to implement safeguards within our solutions that enhance the security of your Destiny system.
Encrypting Destiny® data files
Protecting data on the Destiny application server for v9.0 and higher Overview
This content describes how a system administrator can further protect application data on the Destiny application server by encrypting external Destiny data files. Certain Destiny data files are stored and served from standard drive folders on the Destiny application server. This data includes text documents such as patron import files and report output as well as image files such as patron pictures. These files are external to the SQL database and as such are to be protected from unauthorized access with normal Windows access controls—logon authentication and file permissions. External files can still be accessible to physical access such as theft of the server or hard drive. Hard drive protection by normal logon access control can be bypassed by booting a separate operating system or plugging the hard drive into another computer.
Protecting with Encryption
Some customers may wish to protect Destiny files against such physical access. You can do this with file encryption. With file encryption, files are stored as unintelligible characters and are therefore protected even when an attacker has full physical access to the hard drives. Even a remote user session cannot read the files if that account has not been granted encryption rights to them.
Using the Encrypted File System
The encryption mechanism recommended for use with Destiny is the Encrypted File System (EFS) technology built into Windows Server®. EFS allows the system administrator to designate that certain files should be encrypted whenever they are saved to disk. Because EFS is integrated with NTFS, the encryption process occurs automatically and is transparent to authorized user accounts. Furthermore, there are no third-party add-ons to install and manage.
According to Microsoft, "Only authorized users and designated data recovery agents can decrypt encrypted files. Other system accounts that have permissions for a file—even the Take Ownership permission—cannot open the file without authorization. Even the administrator account cannot open the file if that account is not designated as a data recovery agent. If an unauthorized user tries to open an encrypted file, access will be denied."
EFS encryption strength
EFS uses industry-standard public-private key technology to provide strong encryption. Windows Server uses the Advanced Encryption Standard (AES) algorithm by default, which uses a 256-bit key for encryption and decryption. The encrypting/decrypting process is performed in kernel mode, eliminating the risk of keys being left in an external paging file.
Encrypting Destiny data
EFS encryption can be set at the folder level so that all files created in that folder are automatically encrypted. In Destiny, the Follett folder is the parent folder (FSC-Patron folder commonly being inside of it) under which non-SQL data files are stored. Assigning EFS encryption to this folder and below will encrypt external Destiny files.
You can use an existing user account on the server to encrypt the Destiny folder, or create a new one specifically for this purpose. The steps below assume you will be creating a new account.
|
Important: Be sure to stop the Destiny Server service before performing these steps. |
Create a new user account on the server for the Destiny Server service
- Select Start > Control Panel > Administrative Tools > Computer Management. The Microsoft Management Console opens.
- On the left-hand side, expand the Local Users and Groups tree and select the Users folder.
- In the right-hand window, right-click and select New User.
- Enter a user name and password and set the options for the new account.
Make sure you select the following options:- Password never expires
- User cannot change password
Important: Do not select these options: User must change password at next logon and Account is disabled.
- Click Create.
- Select Start > Control Panel > Administrative Tools > Local Security Policy.
- On the left-hand side, expand the Local Policies tree and select User Rights Assignment.
- On the right-hand side, double-click Log on as a service.
- Click Add User or Group.
- Select the Destiny account.
- Click OK.
Modify the Destiny Server service to run under the new account
- Unregister the Destiny Server Service, as follows:
- Open a command prompt and navigate to the \FSC-Destiny\jboss\bin directory.
- Run the following command: destiny unregister
- In the \FSC-Destiny\fsc\bin directory, create a plain text file named password.conf and add the following lines:
wrapper.ntservice.account=<domain name>\<user name>
wrapper.ntservice.password=<password> - Log in to Windows Server using the Destiny account.
- Register the Destiny Server Service, as follows:
- Open a command prompt and navigate to the \FSC-Destiny\jboss\bin directory.
- Run the following command: destiny register
- Close the command prompt.
Update the folder properties on \FSC-Destiny
- Log in to the Windows server using an Administrator account.
- Open Windows Explorer and navigate to the \FSC-Destiny folder.
- Right-click on the \FSC-Destiny folder and select Properties.
- On the Security tab, add the Destiny user account and grant it Full Control.
- On the General tab, click Advanced.
- Select Encrypt contents to secure data.
- Click OK.
- On the General tab, click Apply. The Confirm Attribute Changes box opens.
- Select Apply changes to this folder, subfolders and files.
- Click OK.
- Restart the Destiny Server service.
At this point, you should have no unencrypted data in your Destiny installation. Be sure to check for any Destiny-related data (such as patron upload files) that may have been stored elsewhere on the server and move it to the FSC-Destiny directory if necessary. If you prefer to keep these files outside the FSC-Destiny folder, you can encrypt the folder where they are stored using the same Destiny account.
When running command-line utilities (such as patron or class uploads) from an encrypted folder, be sure to first log in to the Windows server using the Destiny account. When running command-line utilities from an encrypted folder as a scheduled task, be sure to configure the scheduled task to run as the Destiny account.
Backup notes
This process only encrypts the contents of the folder where Destiny is installed. If you copy the contents of the Destiny directory to another location, the files may not be encrypted in the new location. This is important to keep in mind when making backups of Destiny. You may want to encrypt your backup location as well, using the same steps as above. In case of server malfunction, you may also want to export the certificate that you used to encrypt the folder. For more information on this process, contact Microsoft technical support.
Recommended Best Practices
- Follett recommends that you configure Destiny to notify you when autoupdates are received and to automatically apply autoupdates.
- Routinely update/change all passwords on the server, including any database account passwords or domain credentials.
- Investigate the possibility of conducting regular vulnerability scans of the server and its hosted content to help identify and mitigate potential vulnerabilities.
- Ensure systems are patched in a timely fashion and verified routinely.
- MS-ISAC recommends implementing logging and monitoring logs to ensure that only authorized users are accessing resources and identify any unauthorized modifications or unusual traffic. Store logs for a minimum of 90 days.
- Ensure antivirus and antimalware solutions are properly maintained. Signatures and detection engines must be updated to ensure optimal protection from threats.
- Perform regular backups of all systems to limit the impact/if when a compromise occurs.
- Apply the principle of Least Privilege to all systems and services.
- Enable encryption of your data “at rest” in MS SQL Server.
Click here to download the pdf.